print this page | close window | next -> | page: [1] 2 3 | <- previous
Billiard Fabric Installation Guide
Congratulations!
You have made a wise choice in selecting the finest, most durable worsted billiard cloth preferred by the most discriminating amateur and professional players. The Championship Tour Edition Worsted Cloth is 24oz., 70% Wool and 30% Nylon constructed on the finest looms utilizing unique dying and construction technology. This ensures that it is the most durable, accurate and fastest worsted billiard cloth available anywhere.
To assure that optimum performance is obtained we recommend you follow closely these installation instructions.
ATTACHING CLOTH TO TABLE
When covering tables, first clean the table thoroughly,
then check the slate for level and shim where required. Make sure the
screws are fully tightened. Then grout the joints with a flexible filler
such as beeswax. Do not use paraffin or plaster of paris.
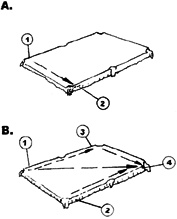
| 1. | Leave only enough cloth for one end of slate and one side (location 1) to allow stapling into the wood frame in 3 places, approximately 2" apart. |
| 2. | Stretch cloth tightly across table and staple three places at (location 2) 2" apart. |
 |
|
| 3. | Stretch the cloth tightly from (1) to (3) and staple three places into wood frame 2" apart. |
| 4. | Stretching cloth tightly across table from (3) and pulling from (2), staple two places at (4). |
 |
|
| 5. | Stretch cloth tightly from (1) toward side pocket (5) and staple three places. |
| 6. | Repeat step 5, stretching from from location (3) and staple at location (6). |
| 7. | Stretch cloth tightly across the table from (5) and toward side pocket (7) from (2) and staple at location (7). |
| 8. | Repeat step 7, stretching cloth from (6) and toward the side pocket at (8). |
| NOTE: At the side pockets there may be a small pucker at the center. This will disappear in step 17. | |
 |
|
| 9. | At (9), cut a short slit in cloth at the edge - centered on the side pocket opening. Grasp cloth firmly above the slit, pull the cloth in to the side pocket opening and staple to the underside of the frame while working out any wrinkles. |
| 10. | Stretching cloth tightly across the table from (9), repeat above step at (10). |
 |
|
| 11. | Staple cloth at (11) leaving a little
slack at the corner pocket opening. |
| 12. | Pull cloth tightly from (11) to (12) and
staple three places at (12). |
| 13. | Stretch cloth tightly from (11) to (13) and staple on approximately 3" centers. |
| 14. | Stretch cloth tightly from (12) and (13) toward (14), and staple in three places at (14). |
| 15. | Staple cloth on approximately 3"
centers on each side (1) and (3). |
| 16. | Stretch balance of the cloth across the table from (11) to (12) and staple. |
 |
|
| 17. | Stretch cloth tightly down the length of the table from location (15) assuring that the slight pucker at the side of the pockets has disappeared - staple securely. |
| 18. | Stretch cloth tightly across the table at each side of the center pockets and staple on approximately 3" centers. |
| 19. | Stretch the cloth into the corner pockets and staple to the underside of the slate frame. If necessary cut short slits in the edge of the cloth to assure there are no wrinkles. |
| 20. | Trim off all excess cloth around the table. |
 |
|
|
|
|
| print this page | close window | next -> | page: [1] 2 3 | <- previous | |
|
D & R Industries, Inc. 7111 N Capitol Drive Lincolnwood, IL
60712 |
|
