print this page | close window | next -> | page: 1 [2] 3 | <- previous
Billiard Fabric Installation Guide
ATTACHING CLOTH TO RAILS
| Corner Pockets: | |
| 1. | Place new cloth over rail with "face" side down. The cloth should have an equal over-hang at each end of the rail and extend approximately 1/2" over the featherstrip groove on the cushion side (as shown in figure 1). |
 figure 1 |
|
| 2. | Starting at the center of the rail, tap the featherstrip down to within 1/16" above the rear side of the featherstrip (Figure 1). |
| 3. | Stretching the cloth tightly from the center toward the ends, tap the feather strip down to 1/16" while maintaining the half inch over-hang to within approximately 3" from ends of the featherstrip. |
 figure 2 |
|
| 4. | At each end of the featherstrip pull the cloth toward rubber cushion an additional 1/2" toward the cushion then tap the featherstrip down (Figure 2). |
 figure 3 |
|
| 5. | Trim the cloth on the cushion side of the featherstrip along the entire length of the featherstrip with a sharp knife as shown in Figure 3. |
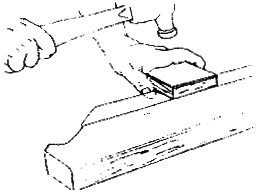 figure 4 |
|
| 6. | Tap the entire length of the featherstrip flush with the top of rail at the rear side of the featherstrip (Figure 4). Never try to tap the feather strip flush with just a hammer as you will dent the rail surface behind the featherstrip. |
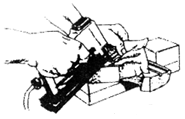 figure 5 |
|
| 7. | Turn the rail over and at the corner pockets fold the cloth over the mitered edge as shown in Figure 5, stretching the cloth tightly and working out the wrinkles as you staple in the area shown in Figure 5. |
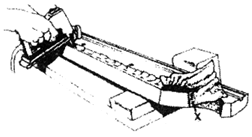 figure 6 |
|
| 8. | Pulling the cloth tightly over the rear edge of the pocket facing, staple three places at Figure 6, location X. |
| 9. | If the rail is an end rail repeat step 8 at the other end of the rail. Then starting at the center of the rail stretch the cloth tightly over the cushion and staple at the center on the bottom of the rail - working toward each end (Figure 6). |
| 10. | Trim any excess cloth from the bottom of the rail (Figure 7). |
| Side Pockets: | |
| 11. | 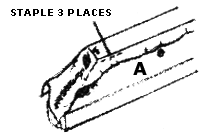 At
the side pocket, stretch the cloth tightly over the nose of the cushion
and staple in three places as shown in Figure A. At
the side pocket, stretch the cloth tightly over the nose of the cushion
and staple in three places as shown in Figure A. |
| 12. | 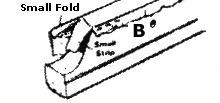 Slit
the cloth up to the edge of the cushion nose as shown in Figure B,
then firmly pull the small strip to the rear of the pad. Slit
the cloth up to the edge of the cushion nose as shown in Figure B,
then firmly pull the small strip to the rear of the pad. |
| 13. | 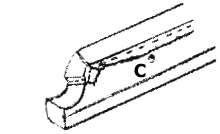 Hold
the small fold in place with your thumb and forefinger and firmly
fold it down over the facing. Now staple at the rear of the facing
and at the bottom of the rail as shown in Figure C. Hold
the small fold in place with your thumb and forefinger and firmly
fold it down over the facing. Now staple at the rear of the facing
and at the bottom of the rail as shown in Figure C. |
| 14. | Trim excess cloth as required. |
|
|
|
| print this page | close window | next -> | page: 1 [2] 3 | <- previous | |
|
D & R Industries, Inc. 7111 N Capitol Drive Lincolnwood, IL
60712 |
|
